We have been running Jenkins on Amazon Elastic Kubernetes Service (EKS) for a while now, and the setup has gotten to a place where I think it is worth writing down. No static agent nodes, no SSH keys flying around, no clicking through the Jenkins UI to create jobs. Every build spins up a fresh pod, does its thing, and dies. Every job is defined in Git.
This post is a walkthrough of how the pieces fit together. I have stripped out the boring bits and kept the parts I think anyone running Jenkins in 2026 should actually care about. If you want a higher-level Jenkins reference first, our Jenkins pipeline best practices guide pairs well with this one.
The Big Picture
Three ideas hold the whole setup up:
- Stateless controller, stateful storage. The Jenkins master runs as a single-replica StatefulSet with an EBS-backed PVC. So when the pod restarts or we bump the image version,
$JENKINS_HOMEis still there. - Ephemeral agents. Every build creates a new pod from a YAML template, runs the build, and the pod gets deleted. The template lives in Git alongside the pipelines.
- Jobs as code. Folder hierarchy, parameters, pipeline scripts, all of it is Job DSL Groovy in a repo. A seed job runs the DSL and Jenkins materialises everything else. Nothing is configured through the UI.
Here is what it looks like end to end:
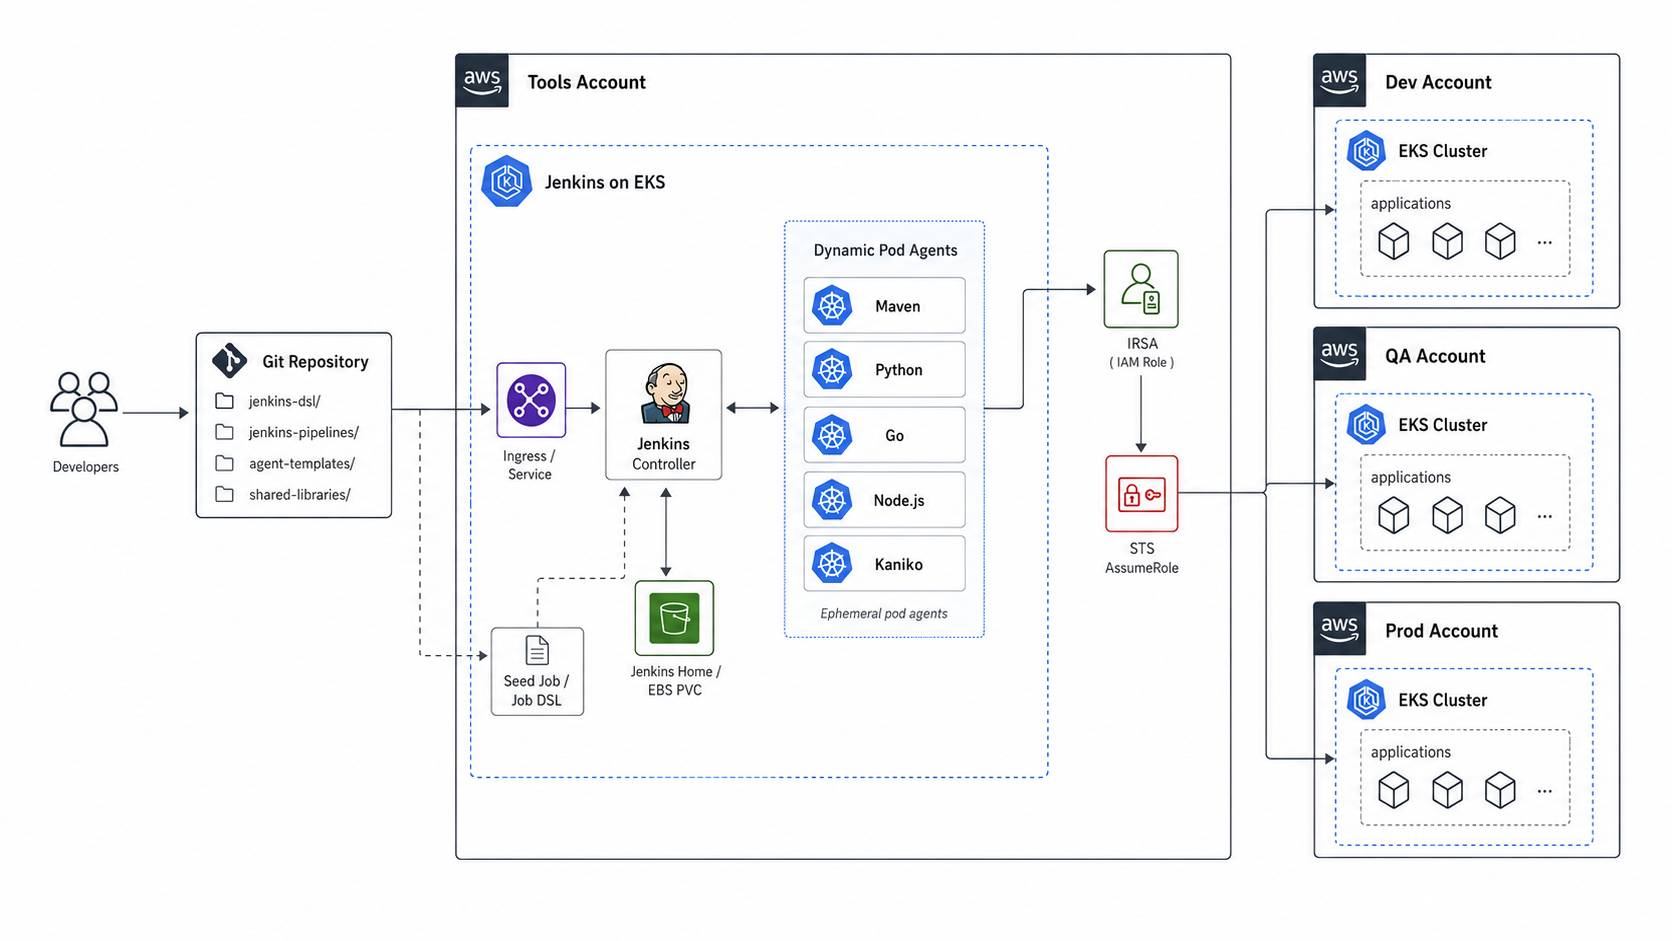
Everything lives in one namespace called jenkins. The controller, the agents, the ConfigMaps, the Secrets. Keeps RBAC small and easy to reason about.
IRSA: No Long-Lived AWS Keys, Ever
The first thing I want to talk about is AWS auth, because honestly this is where most Jenkins-on-Kubernetes setups go sideways. People end up with an AWS access key stored as a Jenkins credential and then they cant rotate it, they cant audit it, and it ends up in someones laptop somewhere.
We use IRSA (IAM Roles for Service Accounts). The Jenkins service account is annotated with an IAM role ARN. The EKS pod identity webhook injects a projected token into every pod that uses this service account, and the AWS SDKs pick that token up automatically.
apiVersion: v1
kind: ServiceAccount
metadata:
  name: jenkins-serviceaccount
  namespace: jenkins
  annotations:
    eks.amazonaws.com/role-arn: arn:aws:iam::<aws-account-id>:role/jenkins-ci-role
That is the whole thing. No keys, no rotation, no secrets in Jenkins. The base IAM role gets whatever permissions our pipelines need (S3, EKS describe, SSM Parameter Store, etc).
Cross-Account With Profile Chaining
Here is the real reason we set this up. We wanted one Jenkins that can deploy code to our dev EKS, staging EKS, and prod EKS clusters, all of which live in separate AWS accounts. One pipeline, three target environments, no copying credentials around.
This is a pretty standard pattern: dev in one account, staging in another, prod in a third. Separate accounts keep blast radius small, costs traceable, and IAM clean.
But Jenkins runs in one of those accounts (or a shared services one). So how does it reach into the other two without becoming a static-key dumping ground?
The bad way (which most setups fall into): create an IAM user in every target account, generate access keys, paste them into Jenkins credentials. Now you have permanent keys to rotate, audit, and worry about leaking. If Jenkins gets compromised those keys give an attacker the keys to all three environments. Adding a new cluster means a new IAM user and a new set of keys. Painful and risky.
The good way: STS AssumeRole chains. Jenkins has its own identity in its home account through IRSA. Each target account has a deploy role with a trust policy that allows Jenkins to assume it. When a build needs to talk to the staging EKS, Jenkins exchanges its IRSA token for temporary credentials in the staging account. The credentials last about an hour, the AWS SDK refreshes them automatically, and no long-lived keys exist anywhere.
The aws/config file is how we make this transparent to pipelines:
apiVersion: v1
kind: ConfigMap
metadata:
  name: awsconfig-configmap
  namespace: jenkins
data:
  config: |-
    [profile prod]
    role_arn = arn:aws:iam::<prod-account-id>:role/jenkins-ci-role
    web_identity_token_file = /var/run/secrets/eks.amazonaws.com/serviceaccount/token

    [profile nonprod]
    role_arn = arn:aws:iam::<nonprod-account-id>:role/jenkins-deploy-role
    source_profile = prod
    role_session_name = jenkinssession
What is happening here, step by step:
- The
prodprofile authenticates directly with IRSA. Theweb_identity_token_fileline points at the projected service account token Kubernetes mounts into the pod. The SDK reads that token, callssts:AssumeRoleWithWebIdentity, and gets temporary credentials for thejenkins-ci-role. No password, no key, no secret. - The
nonprodprofile says “to use me, first authenticate assource_profile = prod, then use those creds toAssumeRoleintojenkins-deploy-rolein a different account.” - The SDK handles the chain transparently. When a pipeline runs
aws --profile nonprod s3 ls, the SDK walks the chain backwards: get IRSA creds for prod, use those to assume the nonprod role, then make the S3 call with the nonprod creds.
The one-time setup you need on the target account’s role is a trust policy that says “allow the jenkins-ci-role from the Jenkins account to assume me”. That is the whole permission story. Once that trust is in place, the pipeline just refers to the profile name and everything else is automatic.
Adding a new account is a five-line addition to this ConfigMap plus a trust policy on the new role. No keys, no rotation, no shared secrets. This single pattern has saved us alot of pain.
The Jenkins Controller (StatefulSet)
The controller is a single-replica StatefulSet because Jenkins is stateful. $JENKINS_HOME has plugin state, build history, job config, credentials. Lose it and you are starting over. If you are planning the underlying cluster, our EKS architecture best practices guide covers the cluster-level decisions that this Jenkins setup sits on top of.
Rather than dumping the whole manifest, here is what we actually configure and why each bit is there:
Zone-pinned scheduling. EBS volumes are zone-bound. So we pin the pod to the same zone as the PVC using nodeAffinity on topology.kubernetes.io/zone. Without this, after a restart the pod can land in a different AZ and just fails to attach the volume. The pod sits there forever with a Multi-Attach error. If multi-AZ availability matters more to you than simplicity, swap EBS for EFS and drop the affinity.
A 100Gi gp3 PVC via volumeClaimTemplates. This is the $JENKINS_HOME mount. Sized for plugin state, build logs, and a reasonable retention window. It grows over time so put it on a graph.
JAVA_OPTS for fast agent provisioning. Out of the box, Jenkins waits a while before spinning up new agents when builds queue up. We pass a few flags to make it more aggressive:
NodeProvisioner.initialDelay=0- dont pause before provisioningNodeProvisioner.MARGIN=50andMARGIN0=0.85- scale up soonerkubernetes.websocket.ping.interval=30000- keep long builds alive when there is an NLB in front. We had agents getting disconnected on multi-hour builds before this was set.
Two container ports. 8080 for the UI/API and 50000 for inbound JNLP from agents. Both exposed via a ClusterIP service. The ingress is internal-only, so the controller never gets a public IP. You hit it through the VPN.
Why The Init Container Matters
This one needs its own paragraph because it trips people up.
Jenkins inside the container runs as UID 1000. But EBS volumes get mounted as root-owned by default. So if you just start Jenkins on a fresh PVC, the Jenkins process cant write to /var/jenkins_home. The pod crashloops with permission errors and the logs are pretty unhelpful about why.
The init container fixes this before Jenkins starts. It runs chown -R 1000:1000 /var/jenkins_home/ and hands the volume over to the Jenkins user so it can actually write.
Init containers run to completion before any normal container starts. So by the time the Jenkins master boots, ownership is fixed. Boring stuff, but skip it and the master never comes up cleanly on a fresh PVC.
The Real Magic: Dynamic Build Agents
This is the part I would actually recommend reading if you only have time for one section.
Here is the thing about old-school Jenkins. You have a fixed pool of agent nodes. Each build claims one. Hit your max executor count during a busy hour and builds just sit in the queue. Developers ping you on Slack asking why the deploy hasnt started. You spin up another agent VM. Next week it happens again.
The Jenkins Kubernetes plugin makes that whole problem disappear. It points at the in-cluster API (no creds needed, it uses the controllers service account). For every build, it reads a YAML pod spec from the jobs repo, creates a fresh pod in the cluster, runs the build inside it, and tears the pod down the moment the build finishes.
There is no fixed agent pool. The cluster’s autoscaler is your agent capacity. If 50 builds get triggered at once, 50 pods start in parallel. The only thing that gates concurrency is how many nodes EKS is willing to give you, which honestly comes down to how much you want to pay for compute that hour.
Once we moved to this model, a few things changed:
- The build queue went to zero. Pretty much always, even during deploy storms. Builds run immediately because a new agent is just
kubectl create podaway. - No more snowflake agents. Every build starts from the same template. The agent that ran yesterday is the agent that runs today, byte for byte.
- Adding a new build tool is a pull request. Edit the pod template, open a PR, get it reviewed. No SSHing into agent VMs, no Puppet, no Ansible runs.
- Pipelines live in Git too. Every build pulls its
Jenkinsfile(or pipeline script) fresh from the repo on each run. So changing build logic is a PR, not a session in the Jenkins UI clicking through fields. Reviewable, auditable, and rolling back a bad change isgit revert. The manual effort on Jenkins itself drops to almost nothing. - We only pay for the seconds builds actually run. Pods come up, do the work, go away. No idle agents burning compute overnight.
Our pod template has one container per tool family. So instead of one giant fat agent image with maven and terraform and kubectl and the docker CLI and aws-cli all crammed in, we have separate containers and the pipeline picks which one runs each step.
Configuring the Kubernetes Plugin
Before any of this works, the Kubernetes plugin needs to be installed and pointed at the cluster. This is a one-time setup on the controller.
Install it from Manage Jenkins → Plugins → Available and search for “Kubernetes”. Once installed, go to Manage Jenkins → Nodes → Clouds → Add a new cloud → Kubernetes. Then fill in:
- Kubernetes URL:
https://kubernetes.default.svc. That is the in-cluster DNS name for the Kubernetes API. No external endpoint, no kubeconfig file. - Kubernetes namespace:
jenkins. The plugin will create and destroy pods in this namespace only. - Credentials: leave it empty. The plugin uses the controllers service account token (the one IRSA injects) to talk to the API.
- Jenkins URL:
http://jenkins-service:8080. The in-cluster Service name for the controller. Agents use this to register back. - Jenkins tunnel:
jenkins-service:50000. The JNLP port. This is how the JNLP agent process inside each build pod talks back to the controller. - WebSocket: enable this if you have a load balancer or ingress between the controller and the agents. It survives proxy timeouts much better than raw JNLP.
Hit Test Connection and you should see Connection test successful. After that, the plugin can list, create, exec into, and delete pods in the jenkins namespace.
The RBAC Role we mentioned earlier is what gives it those permissions: create, get, list, watch, delete on pods, plus pods/exec and pods/log. Namespace-scoped, not cluster-wide. The plugin does not need anything outside the jenkins namespace.
The Pod Template Format
The template is just a regular Kubernetes Pod spec. Here is the overall shape of the file, with the details left out so you can see the skeleton:
apiVersion: v1
kind: Pod
spec:
  serviceAccountName: jenkins-serviceaccount
  containers:
    - name: maven
      image: maven:3.9-eclipse-temurin-17
      command: [cat]
      tty: true
      volumeMounts:
        - ...

    - name: kubectl
      image: ...
      command: [cat]
      tty: true

    # repeat once per tool: nodejs, python, go, kaniko, ...

  volumes:
    - name: aws-config-volume
      configMap: { name: awsconfig-configmap }
    - name: aws-volume
      emptyDir: {}
The only Jenkins-specific trick is command: [cat] and tty: true on each container. The container starts, runs cat against a tty, and sits there waiting on stdin forever. When the pipeline says container('maven') { sh 'mvn package' }, Jenkins runs kubectl exec into that container and executes the shell. Repeat the same block once per tool you need.
What Goes In The Template
We have one container per build runtime, plus one per “ops tool”. Pick the ones your team actually uses, skip the rest.
Build runtime containers (one per language):
mavenfor Java and Spring Boot - image likemaven:3.9-eclipse-temurin-17nodejsfor TypeScript, React, Next.js - image likenode:20-alpinepythonfor Python services and scripts - image likepython:3.12-slimgofor Go services - image likegolang:1.22
Ops tool containers:
kanikofor image builds. Rootless, no Docker daemon, no socket mount. Our default for anything that builds and pushes a container image.kubectl(or kubectl + helm bundled) for applying manifests to the cluster.
You can add more if your team needs them (terraform, aws-cli, ssh-client, etc). But for most app teams these two ops tools cover the deploy path. Keeping the agent template small means smaller pods, faster startup, and less to upgrade.
The whole template lives in Git. Changing a tool version is a pull request. Adding a new language is a pull request. Nothing is configured in the Jenkins UI.
Volumes and Mounts
Two volumes do most of the heavy lifting. Worth understanding what each one is for, because this is where the agent template gets confusing the first time you read it:
AWS config ConfigMap. Mounted at /root/.aws/config in every container that touches AWS. This is how the cross-account profile chaining we set up earlier becomes visible inside the build. Every container that mounts this gets the prod and nonprod profiles for free, no further config needed.
AWS scratch volume (emptyDir). Mounted at /root/.aws in the same containers. The AWS SDK caches assumed-role credentials and SSO tokens here. emptyDir means the cache lives only as long as the pod, which is only as long as the build. When the build ends, the pod dies, and the cached credentials disappear with it. That is exactly the property we want.
We also mount SSH keys from a Kubernetes Secret into containers that do git clone over SSH, and a GitHub token Secret into containers that hit the GitHub API.
Worth calling out what we dont mount: the host Docker socket. People often mount /var/run/docker.sock into a docker container for fast image builds, but that gives the build root-equivalent access to the worker node and couples the agent to whichever node it lands on. We use kaniko instead, which builds images without a daemon and without any host mount.
AWS Auth Inherits From The Controller
The agent pod uses the same service account as the controller. So every container in the build pod inherits the controllers IRSA role automatically. AWS API calls from inside any of them just work. No extra credential plumbing per pipeline. This is the single biggest reason we set up IRSA on the controller in the first place.
Picking a Container in the Pipeline
Inside the pipeline, every stage wraps its shell commands in a container('name') { ... } block. Jenkins routes those commands to the right container in the build pod.
A minimal example:
stage('Build') {
    steps {
        container('maven') { sh 'mvn package' }
    }
}
stage('Deploy') {
    steps {
        container('kubectl') { sh 'kubectl apply -f k8s/' }
    }
}
mvn package runs in the maven container. kubectl apply runs in the kubectl container. Same workspace, same pod, just different tool. The pipeline file stays short because all the tooling already exists in the pod.
Specialised Agents With inheritFrom
Sometimes one job needs something weird. A vendor SDK. A Python CLI we wrote in-house. A database driver that does not belong in the main template. We dont want to bloat the base template every time some one-off comes up.
The pattern: write a tiny supplemental pod spec that just adds the extra container, and reference both files in the pipeline. The Kubernetes plugin merges them at build time using inheritFrom.
The supplemental file is normally just a few lines: a single container with an image, the usual command: [cat] keep-alive, plus any ConfigMap or Secret it needs via envFrom. In the pipeline, you reference the base template with inheritFrom and point yamlFile at the supplemental file. The Kubernetes plugin merges the two pod specs and runs the build in the combined pod.
The base template stays clean. The job-specific container brings its own dependencies. Easy to remove if the job goes away.
Jobs as Code: Job DSL + a Seed Job
If you have spent any time in Jenkins, you know the worst part is reproducing a Jenkins instance. Folder by folder, job by job, parameter by parameter. Painful.
So we dont configure jobs through the UI at all. We use the Job DSL plugin to describe every job as Groovy in a Git repo, and a single “seed” job in Jenkins runs the DSL and creates everything else.
Two Things, Kept Separate
There are two kinds of files in the jobs repo, and it helps to be clear about which is which:
- DSL files. These define the job itself. The name, the folder it lives in, the parameters it takes, the cron schedule, and where to find the pipeline code. Think of these as job metadata. They live under
jenkins-dsl/. - Pipeline scripts. These define what the job actually does when you click “Build”. Stages, shell commands, the real CI logic. Think of these as the build code. They live under
jenkins-pipelines/.
Both live in the same Git repo, but they get loaded by Jenkins differently. The DSL files only run when the seed job runs. The pipeline scripts run every single time a build runs.
How The Seed Job Works
The seed job is just a regular Jenkins job that knows how to read DSL files. It clones the repo, looks at every file under jenkins-dsl/, and either creates or updates the matching job in Jenkins. Run it on a cron, or trigger it from a webhook, or both.
So the workflow becomes really simple:
- You want a new pipeline. Copy an existing DSL file, change the names, commit, push.
- The seed job runs and Jenkins materialises the new job in the folder you specified.
- You click “Build” on the new job.
That is it. No clicking through Jenkins, no remembering to set up folders, no copy-paste between dev and prod jobs.
A typical DSL file is around 20 to 30 lines of Groovy. It has four parts: a pipelineJob block with the folder path and name, a triggers block for the schedule, a parameters block listing the inputs, and an scm block pointing at the pipeline script in Git.
Pipeline Scripts Live in Git, Too
Here is the part that changes how the whole thing feels day-to-day.
The pipeline script (the actual build logic) is not stored inside Jenkins. The DSL file just tells Jenkins where the pipeline script is in Git. Every time a build runs, Jenkins clones the repo and reads the pipeline script fresh.
So if you push a change to a Jenkinsfile, the very next build picks it up. No reload, no UI button, no Jenkins restart. The whole “edit the pipeline through the web editor and pray you do not break it” loop just goes away.
Practically, that means:
- Pipeline changes are pull requests. Reviewable, blameable, and revertable like any other code.
- Branching works the way you would expect. Open a branch, change the
Jenkinsfile, run a build against your branch to test it, merge when it works. - Rolling back a broken pipeline is
git revert. No “find the previous config XML” archaeology.
Folder layout in the jobs repo for context:
jenkins-jobs/
├── containerTemplate/      # The pod templates for build agents
│   └── SlaveContainerTemplate.yaml
├── jenkins-dsl/            # Job metadata (DSL files)
│   ├── common/folders.groovy
│   ├── platform/
│   ├── prod/
│   └── nonprod/
└── jenkins-pipelines/      # Pipeline scripts (Jenkinsfiles)
    ├── backups/
    ├── deploys/
    └── platform/
Three folders, three responsibilities. Pod templates, job definitions, pipeline scripts. Everything else, including the controller manifest, lives in a separate infra repo.
Active Choices: Parameters That Know What Is In AWS
This bit is fun. The Active Choices plugin lets parameter values be computed by a Groovy script when the job page loads. So you can have a dropdown of EKS clusters that is queried live from AWS at the moment someone clicks “Build with Parameters”.
Inside an activeChoiceParam block you give it a Groovy script that returns a List<String>. The script can do whatever you want: shell out to aws eks list-clusters, hit the GitHub API for the team’s repos, query SSM for environment names, read from a database. Common shape:
activeChoiceParam('repo_name') {
    groovyScript {
        script('''
            // 1. Grab a credential by ID (e.g. a GitHub bot token)
            // 2. Call the external API (curl, AWS SDK, etc)
            // 3. Filter and shape the response
            // 4. Return a List<String>
        ''')
        fallbackScript("return ['placeholder']")
    }
}
Two things worth doing:
- Always set a
fallbackScript. If the live query breaks (rate limit, network blip, expired credential), the form needs to still load. Otherwise the whole job page hangs and nobody can run anything. - Look up Jenkins credentials by ID inside the script using
CredentialsProvider.lookupCredentials(...). Never hardcode tokens in the script. The credential ID lives in plain text in the DSL, but the secret stays inside Jenkins.
No more hardcoded dropdowns that go stale. The repo list, the cluster list, the nodegroup list, all live. Saves us from updating Groovy every time someone adds a cluster.
Stuff I Wish Someone Had Told Me
A few operational things we learned the hard way:
Snapshot the EBS volume. $JENKINS_HOME lives on a PVC. We snapshot it on a schedule. Without that, an EBS failure or accidental PVC deletion is a really bad day.
Set idleMinutes on agent templates per job. Default is zero so the pod gets killed right after the build. For chatty jobs (back-to-back builds), set it to something like 20 so the pod stays warm. For one-shot daily jobs, leave it at zero.
Add resource limits to every container. The example template we showed above intentionally omits them. Do not ship like that. Once you know what each tool actually needs, set requests and limits. A runaway Maven build with no limits can evict other pods on the node.
External Secrets is worth the effort. We mount Kubernetes Secrets into agents directly in this post. For real workloads, hook up the External Secrets Operator with AWS Secrets Manager so rotation does not require redeploying YAML. Our Jenkins security checklist goes deeper on the secret management and credential hardening side.
Multi-AZ for the controller is a trade-off. Pinning to one zone keeps EBS simple but means an AZ outage takes Jenkins down. If you need HA, move $JENKINS_HOME to EFS and drop the zone affinity. We decided the operational simplicity of EBS was worth the risk for our use case.
Wrap-up
The pieces fit together like this:
- Kubernetes does scheduling, secrets, RBAC, and pod lifecycle for us. We dont run agent processes ourselves, we let the cluster do it.
- The Jenkins Kubernetes plugin turns every build into a fresh pod. No fixed agent pool, no queue, no snowflake VMs.
- IRSA plus a profile-chain
aws/configgives us AWS auth that is both keyless and cross-account. - The pod template in Git versions the agent definition. Changing a tool version is a pull request.
- Job DSL turns the Jenkins job list into a Git repository. Creating a job is a pull request.
- Pipeline scripts from Git mean changing build logic is also a pull request. Jenkins reads the script fresh on every build, so the next commit just shows up.
The result is a Jenkins that scales out elastically, holds no state outside $JENKINS_HOME, and has basically nothing configured by hand. The whole setup is reproducible from a fresh EKS cluster in about a day.
If you are running a Jenkins that still has snowflake agent VMs and jobs created through the UI, honestly, this is the pattern I would steal. Teams starting fresh might also want to look at our CI/CD pipeline setup guide for startups, or our Jenkins vs GitHub Actions comparison if you are still picking a tool.
Need Help Setting This Up?
Running Jenkins on Kubernetes properly is one of those things that looks simple in a blog post and gets messy fast in real life. IRSA setup, plugin baking, agent template hygiene, Job DSL seed jobs, cross-account access, all of it has sharp edges.
Our team provides Jenkins consulting services to help you:
- Design and migrate to a Kubernetes-native Jenkins with ephemeral pod agents and no static infrastructure
- Set up jobs-as-code workflows using Job DSL, pipeline shared libraries, and seed jobs
- Implement secure AWS access with IRSA and cross-account role chaining (no long-lived keys anywhere)
We have built this for teams across fintech, data engineering, and SaaS, and we know where the broken glass is.